Monday, 12 December 2011

How to Re-wire a Potted Motor, Part 2: Tools/Materials Required for Soldering

You only need the one in the middle

If you can learn to solder, you can breathe new life into that basket-case 15-91 or 201-2 you’ve got with the rotted wiring insulation. If you’ve mastered the wire braiding we went over in Part 1, now you’re ready to try soldering. But before we get to that, I’ll describe the proper tools required, because I don’t want you to overeagerly buy the wrong items first like I did. Read this before you spend any money.

Also consider this: The soldering process requires holding the tip of a soldering iron against your wire joint to heat it, then adding solder. It requires a fairly steady hand--you may have to hold the iron steady for 30 seconds or longer with some precision--so if you have grip issues or arthritis, you may find this challenging; please read the “arthritis” paragraph at the bottom.

Tools and materials you’ll need:


Must-have:

- Soldering iron
- Solder, 63-37
- “Helping Hands”
- Old sponge
- Eye protection

Optional:

- Soldering iron stand
- Respirator


Soldering Iron
Soldering irons come in two different forms, “pencil-” and “gun-” shaped. They also come in different wattages.

After trying out three, I recommend the 40-Watt pencil-style soldering iron. The pencil form factor is easy for me to hold steady, and the wattage is adequate for the task. Radio Shack sells one for $10.99.

The 25-watt pencil soldering iron I bought first is too underpowered. It takes up to two minutes to get the wire hot enough to accept solder.

The 150-watt gun soldering iron I bought second is overkill. It gets very hot very quickly, but is a bit on the heavy side and difficult for me to maneuver, especially when working close to the motor leads.


Solder
Solder comes in a bewildering variety--lead-free, rosin-core, 60/40, 50/50, and in different diameters. What you need is 63-37 Rosin-Core Solder in 0.50” diameter. Radio Shack sells a 1.5 oz spool, which is plenty, for $6.99. (As far as I’ve seen in their stores, that’s the smallest amount they sell.)

“63-37” means it’s 63% tin and 37% lead. This specific percentage is what Singer 221 guru Graham Forsdyke’s motor specialist uses, and he used to work in the Singer factory in Kilbowie, so I’m sure he knows his stuff.

Lead-free solder requires extremely high temperatures to melt, which is why I don’t use it. The other type, rosin-core, melts faster, which is what we want.


“Helping Hands”
You will find this tool invaluable. It’s just two moveable alligator clips attached to a small iron base so it doesn’t move around. When you solder you’ll have the soldering iron in one hand and the solder in the other, so you’ll need something to hold the wires steady, particularly when we get into the actual motor.

I did read about one woman using stacked tunafish cans to sandwich the wires in place while she soldered. I can’t recommend or naysay this method because I’ve never tried it, I’m just throwing it out there.

You should be able to find Helping Hands at your local hardware store or at an art supply store. I bought mine in a local jeweler’s shop in NYC for about $10. There is also a variety for sale on Amazonat cheaper prices, but be sure to read the reviews to avoid the crappy ones that tip over.


Old Sponge
You’ll need an old sponge to periodically wipe the soldering iron tip on while you solder. You’ll also need something to weigh one end of the sponge down, like a brick or a glass bottle filled with water or something. This will all become more clear in the next entry, when we actually get into soldering.

Eye Protection
Chances are slim that something hot will fly up into your eye when you’re soldering, but like most of you, I earn my living with my eyes. If there’s a 0.00001% chance something is going to fly into my eye, I make sure they’re protected. If you don’t already wear glasses, safety glasses are a couple of bucks at a hardware store.


Soldering Iron Stand
I say this is optional because most soldering irons come with a little dinky stand (below) that you can prop the tip on, like a chopsticks rest, to keep from burning your tabletop.


If you’re on a tight budget you can make do without the soldering iron stand and just use the dinky one. But I like using the stand because it’s convenient and has a little place to hold a sponge. I got it at Radio Shack for $8.99. There are also a bunch of these on Amazon.


Respirator
Solder fumes are toxic--it’s gaseous lead--and while a whiff or two probably won’t kill you, breathing it in all the time probably will. If you’re going to solder a lot (as we will for practice), and if you have to do this indoors and you live in a windowless apartment like I do, consider getting a respirator. Otherwise do it next to an open window or if you live in a nicer climate than I do, outdoors.

I bought a respirator years ago because I needed it for various woodworking, sanding and painting projects. I hate wearing it, but I force myself to since I don’t have health insurance. Mine is a model 7501 made by 3M, which comes in different sizes, so I could find one to fit my small face. If you decide you need one, your local hardware store will surely have it. If not, here you go.


For Those with Arthritis
If you have arthritis or grip issues and want to guess if you’ll be able to solder without wasting any money on a soldering iron first, try this. Take the heaviest pair of scissors you own, like a pair of Ginghers or similar. Hold them like a pencil in your main hand, about midway up the scissors. With your other hand, grab a ballpoint pen and hold it like a pen, but up high on the pen. Then touch the tips together, and see if you can keep them touching for about 30 seconds.


It doesn’t have to be exactly point-to-point, but see if you can keep the tips in general contact with each other. This will give you an idea of the manual challenge that soldering demands, and will hopefully help you decide if you’re up to trying it.


Ready?
Thanks for your patience, as I’m sure many of you are eager to jump right into soldering. But if I save even a few of you from wasting money on the wrong soldering iron or wrong type of solder, then I won’t feel like such a dope for blowing my cash on those things.

Next we’ll get to the actual soldering.

Go on to Part 3: Learning to Solder

Sunday, 11 December 2011

How to Re-wire a Potted Motor, Part 1: Wire, Wire Stripping, & Wire Braiding


Singer’s models 15-91 and 201-2 come with beltless, direct-drive motors colloquially called “potted” motors. Sometimes the wiring inside is shot and needs to be replaced; half a century of temperature extremes can rot the insulation away, leaving dangerous bare-metal wires inside an all-metal machine that can transmit a shock to the user.

In this series of entries I’ll teach you to re-wire a potted motor. I’m writing this for people with zero experience, so there are quite a few tools and skills we’ll need to cover. The good news is, you can practice all of these skills without touching your sewing machine, so you can be sure you’ll be able to pull this off before you open your machine up.

Also be aware that you’ll need to acquire a fair amount of tools and materials to re-wire a motor. You or your spouse may already own some. In a nutshell, what we’re ultimately going to need is:

- Wiring
- Wire Strippers/Cutters
- Soldering Iron
- Solder
- “Helping Hands” Tool
- Heat Shrink Insulation
- Heat Gun or cigarette lighter

In addition, you may also need a crimping tool and ring connectors; you'll decide for yourself after we cover how to terminate the wire in a future entry. And don’t worry if you don’t know what some of this stuff is, we’ll eventually get into all of it.


The first things we need to cover are a) the proper type of wiring to use, b) how to “strip” wires, and c) how to braid two wires together.

Types of Wiring

Electrical wiring comes in two types. The first is solid-core, also called single-strand. That’s what a coat hanger is, just one piece of wire. The other kind is called stranded wire because, well, it comes in strands. That’s what we need to use here.


Secondly, wiring comes in a variety of metals like silver, aluminum, copper, etc. We need copper wire.

Thirdly, wiring comes in different gauges, or thicknesses. Plumbing pipes come in different thicknesses too, according to the amount of water that will flow through them. Similarly, the wiring gauge or thickness is commensurate with the amount of current they need to safely convey. What we need is 18-gauge wiring, also referred to as AWG-18. (That “AWG” stands for “American Wire Gauge.” Apologies to overseas readers but I am not sure what the foreign equivalents are.)


Lastly, wiring has insulation--also called “jacketing”--that also comes in different thicknesses. The thinnest type is called SPT-1, and that’s what we need to re-wire a motor, or the sewing machine’s light fixture for that matter. SPT-1 wiring typically goes inside of devices, where there will be no abrasion. There is also a thicker jacketing called SPT-2, and that’s what we’d use to re-wire a foot pedal. SPT-2 typically goes outside of machines, where the thicker jacketing means it can stand up to abrasion. I’ll cover foot pedal re-wiring at some future date.

Left: Black 18-gauge wiring (doubled) with SPT-2 jacketing.
Right: Red 18-gauge wiring with SPT-1 jacketing.
The Wiring You Need

You need to buy “Copper-stranded 18-gauge wiring with SPT-1 jacketing.” Don’t deviate. You should be able to walk into any hardware or electrical supply store and find this stuff. It should be cheap, around 10 cents a foot. Buy two different colors. (I prefer red and black, but all that matters is that you can tell one color from another.) To re-wire your average machine you’ll only need a foot or so of each color, but since we’re going to need to practice a lot first, buy five to ten feet of each.

If they’re out of it, please resist the temptation to buy any other kind of wiring. Don’t mess around with electricity. Buy the right thing. You might be tempted to buy 18-gauge wiring with the SPT-2 jacketing, mistakenly thinking thicker is better, but that’s a mistake, as you’ll see in a future entry.

Wire Stripping

Now that you’ve got the right wire, you need to learn how to strip it. This is so you can connect new wiring to existing wiring. So you’ll need to get your hands on a wire stripper.

Wire Stripper Reviews

All wire strippers are not created equal, as I learned the hard way. Please save yourself a few bucks and have a look at this description of three different types of wire strippers. At the bottom I’ll place a video that shows me using each one.

My buddy Jeff can fix anything with practically any tool. He just has that gift, to be able to take the wrong tool and the wrong fastener and just make something work.

I am not my buddy Jeff. I am not a natural handyman and I do not have that gift. My occasional clumsiness means it really pays off for me to use the best tool for the job, to reduce the chances I’ll screw it up. I’ve written these reviews with that in mind.

This is the most common type that you’ll find in every hardware shop. It’s also, in my opinion, a total piece of crap for stripping wires:


It's made by Gardner Bender and I bought it first because it was inexpensive (under $10) and I didn’t know any better. The way a wire stripper works is you squeeze it around the wire at the point where you want to strip off, and the sharp blade cuts into just the insulation, not the copper part.


Then you can pull the insulation off like pulling a sock off of a foot. In theory, anyway.


If you look closely at this tool, you’ll see it’s so poorly made that the holes don’t quite line up. This makes for messy stripping.


However, the Gardner Bender has a cutter at the tip for snipping wires, and also has a part for crimping, which we’ll cover later. So for those two necessary things, it remains useful.


The second one I bought was a Klein Tools Curve wire stripper ($11.52), which seemed more precisely made.


The holes line up correctly.


But I had a hard time using this tool, as you’ll see in the video below, probably because I’m a klutz. The amount of force I needed to apply to strip the wire just seemed unreasonable. I also don’t want to apply that much force to a wire connected to the motor. 

The Klein Tools wire stripper does have a cutter, so at least there’s that. But overall I do not recommend this one, and I would only buy it if it was the only thing I could get.

The third and final tool I bought, and the one that I love, is this “Katapult,” also made by Klein tools:


At $24.65 it’s the most expensive in the bunch, for a reason: It’s designed in a clever way so that when you squeeze the handle, it automatically strips the insulation and slides it off in one easy step. It places almost no stress on the wire, which I like.


One piece of advice if using the Katapult: After you squeeze the tool and it pulls the insulation off, do NOT just release the handle. If you do, the tool will close too quickly and fray the wiring. What you want to do is squeeze the tool, then gently remove the wiring by pulling it to the left before releasing the tool handles. This is really tough to describe or even show in video, you just have to play around with the tool and you’ll see what I mean. So practice on some wire scraps first.

One lame thing about the Katapult is that it does not have a cutter. If you buy only this tool, you’ll still need to buy one of the others to cut the wire. For a cutter, I’d recommend the crappy Gardner Bender because it's cheap and has a cutter and a crimper--though you may not need to crimp, as we’ll cover in a future entry. Alternatively, you can always cut wiring with a pair of tin snips, aviation shears, or EMT shears, if you have any of those handy.

Here’s the video of what it looks like to use all three of these:


You should be able to find at least some of these tools at your local hardware store. I like to support my local businesses, but for those of you who live out in the sticks, or if your stores don’t carry these things,you can order them from Amazon:


Full Disclosure: I should mention again that if you purchase these tools through these links, Amazon sends me a few cents for sending you their way, as I have signed up for their affiliate program. That does not mean I am urging you to buy things you don’t need so I can make a profit. Feel free to ignore these links! I include them in the event that you do need to mail-order the tool and would like to support this blog.

Furthermore, for those who do wish to support the blog, if you buy anything at all on Amazon (like books or whatever), if you first go to Amazon by clicking the link at the top of this page, they’ll also send me a few cents on that purchase. The price is the same for you whether you go through here or go directly to Amazon, they don’t charge you any extra. But please remember that this blog will always be free and you’re not obligated to click anything. I’m not in this for the money, but I wanted to set up a way to make it possible that a few extra bucks might roll in.

Wire Braiding

Once you’ve gotten good at stripping wires, you’ll have to practice braiding them. Braiding is how you’ll connect new wiring to old wiring in preparation for soldering. When we finally get inside the motor you’ll see you don’t have a lot of room to play around in there, so it’s imperative to practice braiding wires first by using scrap wiring.

Start off by stripping about 3/4” of insulation off the end of a wire.


Then grab it between your thumb and finger and twist, twist, twist.


It should look like this:


This reduces the chances you’re going to have frayed wire strands, which we want to avoid because it causes problems later.

Then strip another piece of wire and braid that one too.

Next, cross the two wires at the midpoints.


Then, braid those two wires together. It should look something like this:


It’s trickier than it looks, at least for me, as my fingers always feel too big. But just keep practicing, practicing, practicing, and eventually you’ll get good at it.

Your first goal should be to braid two wires together tightly enough that when you pull on them gently, they do not come apart. I recommend starting with two 3/4” lengths of exposed wire, or even 1” if you’re clumsy, to get the hang of it.

Then, once you’ve mastered that, start using shorter lengths of stripped wire. Your end goal is to get it down to about 1/2” of exposed wire that you can cleanly braid together.


Once you can consistently braid 1/2” of wiring together nice and tightly, you’ll be ready to move on to soldering, which we’ll get to next.

As you practice braiding each piece, don’t throw those pieces away! Even the crappy ones, save them. Cut each side off so that you’ve got your braid in the middle, and about two inches of insulation on either side. We’re going to use those pieces to practice soldering on.

Go on to Part 2: Tools & Materials for Soldering

Thursday, 8 December 2011

More Updates Soon, and Send Me Craigslist Photos to ID!

Have you gotten any better at ID’ing Singers from Craigslist photos? I hope so, as it can really pay off. Case in point: I’m selling a 201 to an acquaintance, and she needs a table for it. I started cruising Craigslist looking for cheap sewing machine tables/cabinets to buy, and came across this one for $30 (cheap for the NYC area):


I immediately recognized it as a 206, Singer’s first zigzag. At 30 bucks I couldn’t pass it up, so I went the next day and fetched the machine. Not a bad deal; I've got a table for my buyer and scooped up a great machine in the process. 

So how could I tell it was a 206?
 
The giveaways that this was a 206

Model 206s are not easy to come by, and the ad was a week old by the time I stumbled on it. If the person had put “Singer 206” at the top of their ad, I’m sure the machine would’ve been long gone. 

If you need help ID’ing a Singer from a crappy photo, e-mail me a photo or a link to the ad, and I’ll identify it for you if I can. (I’ll post those photos and explanations here, but don't worry, I won't post the link to the ad if you're worried about competition from other buyers.) You can e-mail me at:

vintage (dot) singers (dot) nyc (at) gmail (dot) com 

Due to popular demand, I’ve been working on tutorials for how to re-wire a potted motor, like you’d find on a model 15-91 and a 201-2. Because I’m writing it up “… For Dummies” style, it is going to be long. I am aiming this tutorial at people who have zero electrical experience, so there’s quite a lot of information and tips I need to convey, and even reviews of different tools you can do the job with. Please be patient and I'll starting posting the multi-part series soon. 

In the meantime, feel free to send those Craigslist photos if you need help.

Monday, 19 September 2011

Bad Wiring? Save the Terminal Plug Before You Trash It


As every vintage sewing machine hunter knows, a lot of times you buy a machine and the seller insists you take the cabinet it's mounted in, because they just want it out of their garage. The first few times that's fun--hey, free desk!--but soon you have more cabinets than you know what to do with.

If you have a Singer that's been wired for cabinet use, it will have a "single lead" power cable with just one set of wires going into the terminal plug. Here's the one from my latest acquisition:


As you can see, this one's in poor shape and needs to be tossed. The wiring insulation looks like it dates to the Eisenhower administration and you can see bare metal. But before we get rid of it, we're going to "harvest" the Singer terminal plug, so that later we can easily--and inexpensively--make ourselves a new power cable.


This here's the terminal plug. It's got two screws holding it together and is super-easy to get apart.


A Brownells bit #150-4 fits the screw perfectly. (Click here if you need to learn about screwdriver bits.)


As you loosen the screws, be aware that the little nut on the other side may fall out of the bottom.


So do it over a towel or carpet scrap, so that the nut doesn't fall out and bounce onto the floor, causing you to get down on your hands and knees with a flashlight trying to find the darn thing. (Yes, that's what happened to me the first time.)

Once you've got the screws removed, the two halves come apart and you see this:


Looks intimidating but it's not. All it is is two wires going into two little brass connectors. There's a third brass connector in the center, but this will be empty for a cabinet-wiring configuration.

The brass connectors just pop right out.


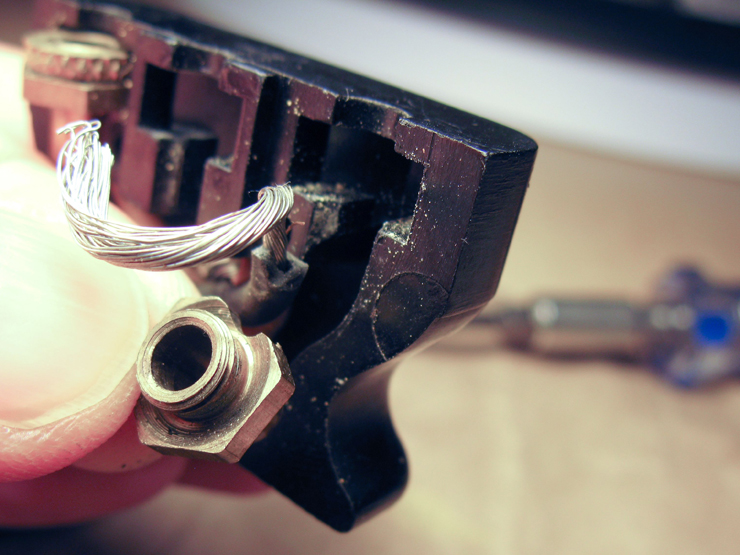
Then you can just unscrew the knurled brass ring, revealing the wiring wrapped around the threaded part.


That wiring pops right off.


Then, do yourself a favor and screw the knurled brass ring back onto the connector before you lose it. Next, cut the wiring outside of the terminal plug and push the remaining wiring through the plug to remove it.


I'm actually going to save this cut-off scrap of wiring, so that later, when we replace it in a future entry, we can copy the knot they used to hold it in there.

After you've removed the wiring, put all three brass connectors back into the plug body.


Then just screw everything back together for safekeeping.


What Not to Do: As you first begin turning the screws, turn them slowly to be sure they're entering the nut at the proper angle. The first time I did this I was in a hurry to get it back together and accidentally forced the screw in at a slight angle. This stripped the end of the screw and ruined the threads inside of the nut, rendering both parts useless. So even though this is a simple little procedure for a simple little part, take your time with it. What I've found in sewing machine repair is that patience is everything; those times that I've rushed something is always when I damage a part or strip a screw.

To turn this into a new, working power cord, you can order the cables with a molded plug right here from Jenny at Sew-Classic, my favorite sewing machine parts supplier. It's only $3.29, versus the $8.69 you'd pay for the molded plug, cable and terminal plug. (She also stocks those right here, by the way.) Not a huge price difference, but if you order just the cables and wire it into the terminal plug yourself, you get the satisfaction of keeping one more piece out of the garbage and back into service. Plus the original Singer terminal plugs have that neat "S" on them.


Just two more things:

One, what I've been referring to here as the "terminal plug" is called, in Singer's original manuals, the "3 pin terminal, female half," just FYI.

Two, I typically drop my bad wiring off at a local recycling center rather than throwing them in the trash. An electronics recycler will take the time to harvest the metal in the wiring and turn it into something useful. If you have a Best Buy near you, they accept old electronics and wiring for recycling free of charge.

Tuesday, 23 August 2011

Restoring a 201-2: Interview with Elle Dubya of "My Sewing Machine Addiction"


Elle Dubya's restoration projects: One down, one to go

A month before I started this blog, California-based homemaker "Elle Dubya" fired up a vintage Singer blog of her own. Titled "My Sewing Machine Addiction," it chronicles her impressive mission of completely tearing down and rebuilding a model 201-2 that she acquired in May. Her blog went up in June, and I've been hooked ever since discovering it. "When I purchased this 201-2, I rushed into buying her," Elle admits, and it's a feeling many of us know well. "I was charmed by her decals, and it wasn't until I got home and into good light that I realized that she was in really bad shape."

The 201-2's condition earned it a nickname: "I named her Ms. Rusty," Elle says. "I couldn't move the needle, her gears were locked up, and she was in dire need of both aesthetic and functional repair.  At that point I figured I couldn't really do any more harm to her so I might as well try fixing her up...even though I was probably diving into the deep end of the pool."


Elle's 201-2 rescue project is fascinating and inspiring because 1) She's tearing down everything on the machine, and 2) she's never done this before. Although her grandmother taught her to sew at a young age, the 40-something Elle didn't get back into sewing until her thirties, and "the vintage sewing machine bug bit me just this year," she confesses. How did that happen? Read on for the Vintage Singer Sewing Machine Blog's first People Profile, the Elle Dubya interview!

VSSMB: You got into vintage sewing machines just this year. What's the story?
Elle Dubya: I was looking to get a Featherweight because they are such cute little machines and are easy to transport to quilting class.  Unfortunately, I'm also a cheapskate, or "bargain shopper" depending on your view… 


…and I didn't want to pay the $300-plus that most people charge for those babies. So I started cruising Craigslist and came across an old black Singer in a cabinet for $75 which just called out to me.

I bought it, but it wasn't until I did more research that I found out that I had a 15-91 Centennial edition that was worth more than I paid.  I learned a lot cleaning her up and refinishing her cabinet, and it wasn't long before I started trolling Craigslist on a regular basis looking for more bargains--or as I tell my husband, investments :)

And eventually you picked up the rusty 201-2 that would become the subject of your blog. How did that happen?
Well, I was trolling Craigslist like I usually do on the weekends and found a picture of what appeared to be a vintage Singer in decent shape.  I'm not yet familiar enough with vintage sewing machines to tell what the model was without more information, so I asked what the model and/or serial number was.  The seller was kind enough to tell me the serial number and using the Singer website I determined she was at 1941 Model 201.  I had been on the Yahoo Groups (Vintage Singers and WeFixIt) long enough to know that the 201 was a good machine so I made arrangements to check her out.

During my visit I found out that the current owner inherited her from his grandmother who bought her brand-new in 1941.  She was taken care of and used up to the day his grandma passed away, some 10 years ago.  During that time he had been storing her in his garage and was hoping at some point to learn to sew and put her to use.  Unfortunately, he needed more room in his garage and he decided that since he hadn't touched her in 10 years that it would be better if she went to a better home. 

We opened her up and discovered that she appeared to have some surface rust (I wouldn't realize how bad the rust was until much later), but we plugged her in to see if she would run.  I adjusted the balance wheel to bobbing winding mode so that only the motor would run without turning over the gears.  The motor hummed right along so at least the motor was in operational condition.  I then tried moving the balance wheel to move the needle up and down, but she wouldn't turn over.  Naively I thought she only needed a little oiling to get her back into shape.  Her decals were in excellent shape, and the cabinet was in fairly good shape - nothing that a bit of minor refinishing work couldn't fix.  The cabinet didn't come with the matching stool, but I figured between the cabinet and what was sure to be an operational machine with a little oil and TLC (ha!) she was worth the $55 asking price.

So far, so good. But then you discovered some problems with the machine?

It wasn't until I got home, took her out of the cabinet, and did a real inspection in good lighting that I found out the real problems she had and thus she earned the name Ms. Rusty.


Being stored in a garage only two blocks from the Pacific Ocean was not kind to her.  She had only surface rust on the chrome, but serious rust on the needle mechanism, the bobbin assembly, the inner gear shaft, and underneath the head.  The back of the machine was the worst and the rust was eating away at the metal under the japanning, causing it to come off in big flakes. The wiring to the motor was also a mess - its a miracle we didn't short the whole thing out when we turned it on. 

It became pretty obvious to me that she was going to need a lot more than TLC and oil to bring her back to functional condition or make her aesthetically pleasing, and hoping for both was a long shot.  That's when I decided neither Ms. Rusty or myself had anything to lose and everything to gain from a complete tear-down and overhaul - even if it meant breaking some rules established by more experienced and knowledgeable people than myself - like powder coating her instead of painting her, taking every single screw out rather than just the minimum needed.

And as you've found, there are plenty of experienced sewing machine wrenchers who'll tell you not to take a machine completely apart.
I put a "words of warning" page on my blog because there was more than one person that 'freaked out' when they found out what I was doing.  I thought it would be a good idea to let them know that what I'm about to do is probably stupid, but I'm going to do it anyway (LOL).


What made you decide to document the project in a blog?
Since I didn't really know what I was doing, I knew I would need lots of pictures to help me get her back together again--if I could even get her apart.  I also tend to take lots of notes when I do my restorations or projects of any kind (probably due to many years taking notes in class and in meetings).  I needed a place to store all those pictures and notes in some sort of organized way, so starting a blog was just as good a place as any.  I really didn't expect anyone to read my blog, but I figured if there was some slight chance that there might be someone that would find this information helpful, then it couldn't hurt to make the blog public.  Honestly, I'm shocked that there is anyone besides my husband following my blog and even more shocked at the number of page views my blog has had.  There are more sick people out there than I realized (LOL)!

Let's talk about your previous wrenching/restoration experience.
When I was 15, I worked on a 1967 Chevelle Malibu with my step-dad. That was my first restoration project. The car was covered in rust so I learned how to remove rust using a belt sander(!). I also learned how to use your standard tools, like screwdrivers, wrenches, pliers, et cetera; how to polish chrome; and most importantly, I learned that perseverance and attention to detail pays off in the end.

When I was in my 30s, I found another 1967 Chevelle Malibu for sale. I bought it and restored it myself so I could finally drive my dream car. [Pictured up top.] It was my daily driver for a while and now I just drive it on the weekends and for shows. 

My first real sewing machine restoration is Ms. Rusty, the 201-2 that you see on the blog.  I had also done some work on the 15-91 Centennial, "Ms. C, "but that wasn't much more than just cleaning the surface, replacing the grease, and oiling her up.


After an Evaporust bath


Impressive before/after of the handwheel
You've showed us some pretty hardcore restoration steps on your blog, like bead-blasting and powder-coating. Your husband has an unusual hobby that has had a positive result on your restoration, no?
My husband's hobby is building experimental aircraft, which makes my sewing machine hobby look like child's play :) Some of the extra equipment he has is a sandblaster (beadblaster); a powder coating set-up, including oven; and a few welders (mig, tig, oxy-acetylene, etc.), and wiring equipment such as soldering gun and heat gun.  He's built and flown two airplanes so far and is nearly finished with his third.  He's also a professional diesel mechanic, so he is a good sounding board for my ideas and encourages me in my tinkering adventures.

I'm pretty sure I would have still dove into completely refurbishing Ms. Rusty if I didn't have access to all his equipment.  I just would have used more traditional techniques such as using paint stripper instead of sandblasting and using auto paint instead of powder coating.  It would likely have taken longer and may or may not have looked as good, but it certainly is more fun to use my hubby's toys for this project!


As the title of this blog suggests, I'm only interested in fixing up vintage Singers; but I think a lot of the readers are more interested in sewing in general, and a wider variety of machines. Can you tell us what you like to sew, and what machines you use?
As far as sewing, I really enjoy quilting because you can be creative and it always fits!  But I also like sewing clothes, hats,curtains, and other home dec items.  Last summer I did quite a bit of sewing and embroidery for my baby sisters wedding, including making and embroidering her veil, ring bearer pillow, flower girl basket, and several other items.  I'm still working on her quilt and hope to have that done before her 1st anniversary :)  The first project I did on my vintage 15-91 was a canvas booney hat for my husband.  It would have been difficult to sew through so many thick layers on my modern machines but old Ms. C went through it like a champ - I was impressed!

I use most of the machines I own, some more than others. Here is my current 'family:'

- Ms. Rusty, obviously, a 1940 Singer 201 in a Model 40 cabinet acquired from Craigslist.

- Ms. C, or Ms. Centennial - 1951 Singer 15-91.  She was the one who got me hooked on restoring vintage sewing machines.  She came in a Model 71 cabinet in really poor shape and I ended up spending as much time refinishing the cabinet as Ms. C.  She sews like a dream and is my second favorite next to Ellie (see below),  at least at the moment :)

- GiGi - 1946 Singer 221 Featherweight. My father-in-law (my husband's dad), upon finding out that I was collecting sewing machines, and actually using them, decided to give me his Grandma's (my husband's Great Grandma's) sewing machine.  I almost fell out of my chair when I found out it was a featherweight!  GiGi is short for Great Grandma.

- Ellie - a Baby Lock Ellisimo sewing and embroidery machine.  She is the most modern and versatile of all the machines I have.  Not sure I would want to be without her!

- Sergio - a Baby Lock Evolution Serger.  This is the only machine that has a male name, but it seems appropriate given that it is less delicate and ornamental than any of my other machines and also is the only one with a built-in knife.  He was my present for graduating from business school.

- Jem - a Janome Jem Platinum, which is perfect for taking to classes but is not nearly as cute as a featherweight.

- Blossom - a purple Janome Blossom.  I found her on Craigslist.  As a children's sewing machine she isn't very versatile, nor very practical.  But she is purple, and since that is my favorite color I just couldn't resist buying a purple sewing machine!  I suspect she will eventually go to one of my nieces if they ever get the sewing bug.

- Connie - a Consew Model 18. She was given to me through a friend of the family and will be used when I do the upholstery for my husbands airplane.  I haven't sewn with her yet as I find her a bit intimidating for some strange reason.

- Bernie - 1980 Nova 900 Bernina.  I got her when someone at work heard that I liked sewing and thought that their baby might have a good home with me.  I then called my mother-in-law for her advice and asked if she thought I was being silly to purchase yet another sewing machine.  Her reply was "You don't really expect me to tell you NOT to get a sewing machine, do you?"  When Pops (my mother-in-law's husband) overheard that, he told her that we both belong to the SMAA club - or Sewing Machine Acquisition Addicts club.  Since then, my mother-in-law and I are proud members of the SMAA, adhere to the 12 stitch program (instead of the 12-step program), and don't really have any plans to stop acquiring sewing machines any time soon.

- Several battery operated 'hand' sewing machines, if you really want to count them. 

- I'm still cruising around yard sales and Craigslist looking for my next project.  This past weekend I added another machine to my brood: It's a 306k - not sure of the year as I can't seem to locate the serial number, but it has the model number on a plate below the stitch regulator so it's likely 1960 or older.  She doesn't have a name yet, but since she was made in England, I think she should have a British sounding name, like Gertie or Pippa. 

I recently picked up my first 306 as well. So you'll continue acquiring vintage Singers?
Yes.  I'll likely stay with the black electric motor models, although if the right treadle machine comes along I might reconsider.

Now that you've got nearly three months of the Ms. Rusty project under your belt, what are the best and worst parts of doing a complete sewing machine restoration?
Best parts: Accomplishing something that you didn't really think would be possible.

Worst parts: 1) Finding out that one of your "good" ideas [to solve a particular problem] isn't so good after all, and 2) It taking longer than I expected.

As far as Worst Part #1, that's one of the reasons your blog is so instructive and inspiring: You readily admit and show us when something's gone wrong. I think something that stops a lot of people from attempting repair or refurbishment is this fear of making mistakes. It's encouraging to see on your blog that you can make mistakes and it's not the end of the world. As for Worst Part #2, how long do you anticipate it will take you to finish? Also, do you care how long it takes?
Ha!  Excellent question. My life is pretty crazy right now with work, and I've just started a garden, and we are going to completely remodel our kitchen and living room this fall; if you haven't noticed, I usually bite off more than I can chew.  With all that in mind, I hope to be done by Thanksgiving, but who knows what life will throw at me.  As long as I'm having fun and learning along the way, I don't really care how long it takes.

Thanks again for doing the interview!

Everyone, be sure to check out Elle's progress at My Sewing Machine Addiction.