Sunday 14 July 2013

A Singer 401a and Greasy Terminal Prongs


Hi everyone, I know, long time no talk. I recently got to meet Elizabeth from My Sewing Machine Obsession and that was pretty cool. She mentioned that I hadn't written in a while. Over a year!

I've been busy with work and fixing sewing machines on the side, even making housecalls in Manhattan. If you need repair work done on your machine, are in NYC and/or can bring your machine to me in lower Manhattan, drop a line.

Anyways, a customer brought this Singer 401a to me. She came my way from Peter Lappin's sewing blog. The customer had just purchased the machine from a "reputable" seller online, and the machine had been damaged in shipping, with one spool pin broken off. She asked if I could fix it, I said no problem.


When she arrived with the machine, she mentioned that after five minutes of sewing, the machine would begin to emit a smell. I told her I'd check it out.

Well, never mind the spool pin, I was appalled to see the condition of the machine. So much so that I subsequently looked up the seller. I will not mention him by name, but based on his reputation and self-description, any of us would probably buy a machine from this guy in a heartbeat. He has been working on machines for longer than I've been alive, so I cannot understand how he let these things go.

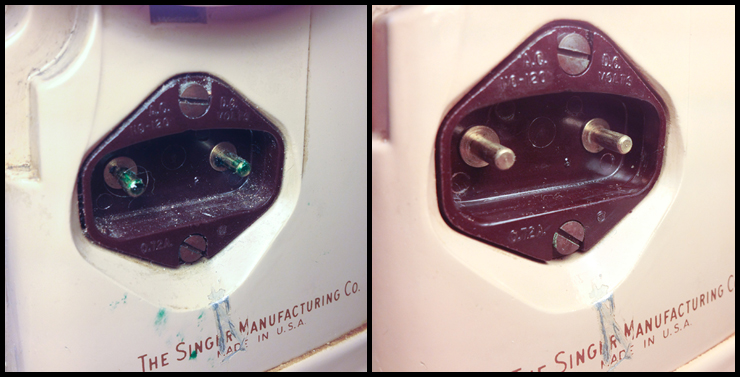
The first thing I went to do is plug her machine in to uncover the source of the smell, but I stopped dead in my tracks. Check it out:


See that green stuff? Old Singer lubricant (grease) turns that shade of green after many years, I've seen it inside plenty a machine. And here it is on the terminal prongs--not good. Even worse, there was more on the cable:


Folks if you ever see this, do NOT plug your machine in. Electricity should never mix with oil, grease, or any kind of lubricant. The woman who brought me the machine is lucky that the machine didn't start a fire.

It's not difficult to clean old grease off of metal, you just go at it with Q-tips and rubbing alcohol. So I'm really surprised the seller was so careless. Here's the terminal after I cleaned it:


However, I was not able to get the grease out of the power cable. There's no way I can see inside, so there's no way I can ensure I've removed every last bit of grease. I told the customer her cheapest option was to order a replacement cable from Sew-Classic. Since it's only $6.99, it really bothered me that the original seller didn't supply one rather than the grease-soaked one.

The rest of the machine wasn't much better. There was an antique-looking piece of thread jammed under the hook assembly, providing friction:


It took me a little time, since it was wound around the shaft, but I fished the thing out. I estimated it was 8 inches long, but I measured it just now out of curiosity and it was a foot.


And the rest of the machine was just filthy. I don't mean the body of the machine, which almost doesn't matter--that's basically cosmetic--but the working parts of the machine, like the tension assembly. I stripped every part that needed it to give it a thorough cleaning. Here are the before-and-after shots:


I saved the spool pin for last. I'm sorry I don't have photos of this part, but I'll explain how to do it in case one of you needs to. With a 401, you have to take the lid holding the spool pins off. I futzed around with the hinges for a while trying to figure out how to remove it without breaking it, then finally realized you just keep moving the lid in the open direction, gently, until it pops off. (This is only the second slant-needle machine I've worked on, I'm usually doing older cast-iron models.)

Then I was going to hammer out the spool pin using a hammer and a blunt nail, which is how I've gotten broken spool pins out of the base of a 201-2 and 15-91 (where you place the spool for bobbin winding). But after clamping the lid upside down to my workbench, I worried that hammering it out might bend the lid.

So instead I drilled the spool pin out, since it was plastic. What you do is start with a 1/16th" bit and drill through the center of the broken spool pin. (Try to get it as dead-center as you can, because you don't want to hit the metal part of the lid and potentially ruin the hole.) Then you just drill through the hole with progressively larger drill bits, and eventually the spool pin fragments just disintegrate and fall out of the hole.

That's the tricky part. Replacing a plastic spoon pin is easy, you just wedge it in there manually, you don't have to tap it in with a hammer like you do with a metal spool pin.

Using one of my own grease-free cords, I spent twenty minutes stitching the machine in and running it full-tilt. No burning smell, and a nice, strong-running motor in this machine.

There's a couple of things I want to say. While I cleaned the customer's machine for a few hours, I didn't give it what I call the "Million-Dollar Treatment," where I slave over a machine for weeks or even months as a time-consuming hobby. Because I think no customer is going to pay for what I'd have to charge them for that kind of time. So I didn't get into every last nook and cranny but instead cleaned up the most offensive and function-affecting areas.

Secondly, to be fair, I do not know what condition the original seller received the machine in. Maybe it was a total train wreck and he brought it back from the dead, and maybe I oughtn't malign him?

Then again, there's no excuse for neglecting basic safety. Yeah, that settles it. Far as I'm concerned the grease on the power cable is a damning indictment. Can you imagine if this poor woman had burned her house down over a sewing machine? Folks, if you're ever going to buy a used machine, please do inspect the terminal and power cable carefully to be sure they're not covered in grease.

I don't mean to be sensationalist or self-promoting. I have never, ever heard of someone burning their house down in a fire caused by a sewing machine. But common sense dictates that any sewing machine repairperson ought to do their best to minimize those risks. It took me less than fifteen minutes to get the grease off of the prongs, and ordering a new cable takes less time than that. Those things should have been done during the initial refurbishment.

If you see that green grease on your terminal prongs, clean it off with a Q-tip and rubbing alcohol, then give it plenty of time to dry off before you plug it back in. And if your power cable has grease in the ports, recycle it and buy a new one--$6.99 is a small price to pay for peace of mind.


Saturday 9 June 2012

How to Remove & Re-Install a Tabbed Stop Motion Clamp Washer


In the previous post, we looked at how to remove and re-install the stop motion clamp washer on a potted motor machine. But many other vintage Singers (like the 66, 99, 206, 306 et cetera) will have a different washer, as seen in the photo above. Here's how you tackle that one:

Wednesday 6 June 2012

How to Stop the Needlebar from Moving During Bobbin-Winding Mode


When you set your vintage Singer sewing machine into bobbin winding mode, by cranking the stop-motion wheel counterclockwise, the needlebar is supposed to stop running. This is to save unnecessary wear-and-tear on the machine, and prevent you from having to unthread the needle to wind a bobbin.

However, if a few crucial parts of your machine are dirty, the needlebar will continue to move even though you are in bobbin-winding mode. This is easy to fix, and I've made two relevant videos, below, to assist you.


This first video explains the parts of your machine involved in engaging and disengaging bobbin-winding mode. If you are not interested in the mechanics of how your machine works, you can skip this first video (though some of you may find the "X-ray" part that starts at 3:15 in the video to be informative).


This second video, below, is where I show you how to actually fix the problem. The video may seem long, since I'm over-explaining things; but once you understand how to fix this, you will be able to fix this problem in mere minutes.


Note: If your stop motion clamp washer doesn't look like the one in the video, but looks like this one below...


...then click here to see how it goes on.

The oil I'm using in the video is Tri-Flow oil, my favorite. If you cannot find it near you (it's often sold at bicycle shops), here's an Amazon link:


Happy fixing!

Saturday 7 April 2012

Reader Questions: Rewiring a 99?

All photos in this entry by Azul from California

Azul from California writes,

I was excited to discover your motor rewiring series, but I have a model 99, which does not have the potted motor and does involve a light switch. The motor is mounted on the side, as seen below.


What I have is a Singer 99-13 (according to the Sandman Singer identifying page) from 1937 which I picked up off the street. It’s in excellent cosmetic shape, but the wiring is in bad shape and down to bare metal in parts (mostly due to my boyfriend pulling away the corroded/melted bits).


I do know how to solder, and have access to the necessary tools and materials (although not yet, alas, the Chapman screwdrivers). My boyfriend knows how to repair electrical stuff in general, but does not have Singer-specific knowledge, although he’s enthusiastic and unworried about this (“it’s a light” and “it’s a motor,” he says). I did take the machine to a local repair place, where they seemed to think the wiring problem not too bad, they doubted that there was internal damage inside the motor, but of course would have to take it apart to know for certain.

My question is this: Do you think your tutorial, along with general principles of electrical repair, would be sufficient to work on this motor, although it’s not exactly the same type as the one in your tutorial? Or are there Singer specific issues that would make you recommend instead taking it to a professional, to for example avoid electrocution :o), or messing up the machine further? I’m not sure if you’re able to answer that, but thought I’d ask.


First off, congratulations on the free 99! That's an awesome find.

Secondly, good on your boyfriend for pulling off the rotted wiring insulation. I’ve seen sellers completely ignore that, as if hoping it will go away. As you can see, the wiring can easily come into contact with the body of the machine, which is all metal. That’s bad news if left untended.

To answer your question: While electricity is obviously dangerous if not handled properly, there is no Singer-specific issue I can think of that would prevent someone with knowledge of “general principles of electrical repair” from correctly re-wiring your motor.

Because we live in a country where people love to sue each other, I think I cannot just tell you to go ahead and do it. But the "sideboard-mounted" motor on your 99 (I put that in quotes because “sideboard-mounted” is not an official term, it’s just what I call it) is a simple and basic universal motor, the same you'd find on a 66, a 206, a 15-90, or a 201-3. The Featherweight 221 would also have a similar motor, with slightly less power. Bottom line: The principles of re-wiring yours would be the same as in the potted motor tutorial, and at the very least you would not have to deal with the worm removal shown in the potted motor tutorial (though you would still have to deal with brushes, grease wicks, the washer on the armature shaft, et cetera). Your motor simply turns the pulley sticking out of it, which in turn drives the belt, simplifying things a bit.

As long as you competently re-wire the machine in the exact same configuration in which it originally was, and using the proper materials, I would think you'd have no problem; but of course I do not have first-hand knowledge of you and your boyfriend's exact skill levels.

Also be aware that if worse comes to worst, you can buy simple replacement motors and install those on your machine, should you not feel like tackling the job. The reason I wrote the tutorial specifically for the potted motors is because those cannot be replaced with new motors due to their unusual design (i.e. the way that they fit onto the machine).

If you do decide to buy a new motor, I recommend Sew-Classic sewing machine supplies. While I've never bought a replacement motor from them (I always re-wire mine myself, to save money and because I find it satisfying), I've bought many other parts from Sew-Classic. Jenny, the woman who runs the company, is knowledgeable, responsive via e-mail in case you don't know exactly what you need, and has a (well-deserved) great reputation. She’s my go-to person when I need parts.

If you do decide to tackle it yourself, remember to take lots of photos as you disassemble the motor, so you have a reference for re-assembly. And a replacement motor is less than $25, which should take some of the pressure off.

Good luck with it,

- Rain

Sunday 1 April 2012

The Difference Between Domestic & Industrial Sewing Machines (or, How Not to Get Swindled on eBay & Craigslist)

Guess which one's the industrial.

There are many eBay and Craigslist sellers selling vintage domestic Singer sewing machines and branding them “heavy duty” or “industrial strength.” Sadly, these sellers are lying in order to fetch higher prices. Beware of these descriptions:

- “Vintage Singer Industrial Strength Sewing Machine”
- “Sews leather!
- “Heavy Duty!”
- “Industrial Grade!”
- "Semi-Industrial!"

Dishonest sellers know that if you put those keywords into any domestic sewing machine ad, naïve people will be fooled and extra money can be made. When I first got into this hobby, I myself was suckered because I didn’t know any better. So now I’m writing this entry to list some facts and prevent future buyers from falling into the same trap.

What’s the difference between a domestic and an industrial sewing machine?


The difference between a domestic and an industrial sewing machine is something like the difference between a regular car and a semi truck.


The basic mechanics are the same--you have an engine that powers wheels, or a motor that powers a needlebar--but the intended applications and method of usage are totally different. That Toyota is designed to get you to the office or the supermarket, or the occasional roadtrip when your spouse needs to torture you with a visit to the in-laws; but that semi will haul multi-ton loads for 10 hours a day, every day, at highway speeds. As you'll see below, a similar difference exists between domestic and industrial sewing machines.

Materials

Domestic vintage sewing machines were designed for housewives of the era. Intended to be a household tool, the machines can handle diverse materials; in the 1940s and ‘50s, the average housewife might be called upon to make everything from clothing to drapery to slipcovers for the couch. She might be sewing something as light as lace, or mending something as heavy as an overcoat. While not necessarily brilliant at any one thing, the domestic machine had to be flexible enough to cover the range.

Industrial sewing machines are intended for use in factories, where people work in assembly lines on highly specific tasks with consistent materials. Some machines are designed to sew shirt cuffs; others are designed to put the waistband on a pair of jeans; still others are designed to attach zippers. Whatever the task, the operator sits there and does that same task over and over again, and the machines are specific to the material weight and the task. An industrial machine is not versatile, but is excellent at performing a few specific tasks.

If you think about it, it’s obvious that a factory making silk bras will have different machine needs than a factory making overcoats. Both will be using industrial machines, and those machines may be completely different from each other. That's why it's pretty dumb if someone says to you, "Hey, you wanna buy an industrial machine? I have an industrial machine!" It's like someone saying "Hey, you need some medicine? I have medicine!" You have medicine, or an industrial sewing machine, that's used for what? If I'm making parachutes and your machine came from a panty factory, it does me no good. I might as well buy cholesterol pills for a broken leg.

Usage

A domestic machine is used for a few hours at a time, and during that usage, it is not running constantly. The sewist puts down a line of stitches, then pauses to adjust the material, insert or remove pins etc., then puts down another line of stitches. It is stop-and-go work and the machine is designed accordingly, with a small motor and standard-sized components.

Let's look at the underpinnings of a 15-91:


Underside of a typical domestic machine. (Oil bottle for scale.)


In contrast, industrial machines are designed for factories, and factories make money by running full-tilt. Your average factory worker puts the pedal to the metal and cranks out hundreds or thousands of pieces a day. Accordingly, industrial machines have powerful motors, thicker shafts, stronger bearings, and beefier gears. They use more steel inside than a domestic does.

Let's look at the underpinnings from a Singer 111w155:


Underside of an industrial features much thicker, heavier parts. (Oil bottle for scale.)

Whether specifically designed to sew silk or heavy leather, an industrial machine uses more robust parts than a domestic, because an industrial must stand up to the abuse of long hours of constant high-speed usage.

Note that the beefy connecting rod, at center-right, looks like something you'd find in a car.


Motors

While not the end-all be-all, the motor is the most obvious indication that you’re dealing with an industrial versus a domestic machine.

I recently bought the Singer 111w155 pictured up top, which is a true industrial, designed to produce automotive upholstery. Take a look at the motor that was connected to it:


Now look at the potted motor of the Singer 15-91, one of the machines I frequently see FALSELY advertised as “Industrial Strength:”


Let's look at them side-by-side:


Get the idea? Even if you know nothing at all about motors, do you honestly believe the one on the left is capable of doing the same thing as the motor on the right? If so, why would factory owners bother buying the bigger motors?

Most industrials have motors that are 1/2 horsepower or 3/4 horsepower. Your average domestic Singer’s motor isn’t measured in horsepower, it’s measured in amps (short for amperes), a unit of electric current.

Horsepower and amps aren’t easy to compare--it’s a bit like comparing how much money Person A has, to Person B’s earnings potential--but if we put them on a rough scale, 1 amp is equal to approximately 1/10 horsepower.

Some sellers will boast that they’ve outfitted their machines with 1.5 amp motors, which according to them, makes them “industrial strength.” Simply not true. A 1.5 amp motor is still less than 33% as powerful as the smallest industrial motor. So don’t be wowed by impressive-sounding numbers. Plus, as you saw above in the photos of the underpinnings, a more powerful motor alone is not enough to make a machine "industrial."

A Word About Leather

Sellers trying to inflate the capabilities of their machine love to put “Sews leather!” in their description. This is a ridiculous and value-less statement, because leather comes in many different thicknesses and types. The lightest, cheapest garment-weight leather is easy to put stitches in on ANY machine, including those plastic Wal-Mart junk jobs. Bring me the crappiest sewing machine you have and I’ll show you a lightweight piece of leather I can sew on it.

What these sellers are hoping is that you’ll believe that if you buy one of their machines, you’ll be able to make gun holsters and horse saddles with their “Industrial Strength” model 99s. Which is, of course, ridiculous.

Some sellers will go a step further and show photos of their machine sewing through thick leather belts. Folks, I have no doubt you can coax a domestic into temporarily sewing through thick leather. I also don’t doubt you could take the Toyota we saw earlier, tie that trailer to the back of it, and under the right conditions, get it to move. But how far do you think you’ll get? And how well do you think that Toyota’s going to hold up before it breaks down?


Here’s the bottom line: The guy bragging about his machine’s leather capabilities is trying to sell it to you. Wouldn’t you rather learn about leather machines from someone who sews leather for a living and isn’t trying to sell you anything?

If so, the forums over at Leatherworker.net are a great place to start. There’s a section called “Leather Sewing Machines” where people with decades of leather experience discuss different sewing machines appropriate for those tasks. Needless to say, you won’t find anyone raving about “Heavy Duty” model 66s.

A Word About “Heavy Duty”

Apart from the sellers who’ll actively lie to you about their machines’ capability, there are others who misinform you because they just don’t know any better. They find a sewing machine in their grandmother’s attic and figure it’s worth big bucks. They try lifting it and discover it weighs 30 pounds. They figure it’s a “heavy duty” machine because of its heft.

Folks, a domestic vintage Singer is only “heavy duty” in the sense that EVERYTHING from that era was “heavy duty”--meaning “overbuilt.” Today we have fancy software that analyzes machinery parts for manufacturers, to help them calculate the absolute thinnest and cheapest a part can be to get through 10,000 cycles before it breaks. Back then we had no such thing. So we overbuilt everything from sewing machines to refrigerators to cars. Pull the door shut on a ’54 Buick, then pull the door shut on an ’88 Buick and see if you notice anything different.

Because vintage Singers were overbuilt, they will last you a lifetime under the normal use for which they were intended. But that does not qualify them as “heavy duty” machines as that term is popularly understood. “Overbuilt” does not mean “industrial,” and here’s the proof:

Go into any garment factory today (or find one on YouTube) and you’ll see the place is filled with industrial machines, whether old or new, that each cost thousands of dollars. Vintage domestic Singers can be found much cheaper than that and are ubiquitous on every Craigslist from New York to Los Angeles. If vintage domestic Singers were good enough to serve as industrials, then why wouldn’t factory owners just buy hundreds of them and fill their factories with these less expensive, easier-to-repair machines? Do you think factory owners simply enjoy spending more money in this economy, or that they are not smart enough to hire Craigslist buyers? No, the answer is simple: They don’t do that because domestic Singers are not cut out for that kind of work.

How Do These Sellers Get Away With It?

Some of the eBay sellers advertising false industrials have 100% user ratings. If what they are selling isn’t as advertised, how is this possible?

Well, early on I unwittingly bought falsely-described machines from two different sellers that both had 100% ratings. When I became frustrated with the performance of the first, I opened it up and found some problems. I contacted the seller and he offered to refund my money in full. The second machine was listed as having been re-wired. I opened that one up too, and found out it wasn’t re-wired. That seller then claimed he had made a cut-and-paste mistake in the listing from a different machine, and offered to send me a free cabinet (that I wanted) to make things right. So both sellers got to keep their perfect ratings and lived to sell another day. (And I was forced to learn how to re-wire a motor.)

Those are just two possibilities for how a dishonest seller can maintain high eBay ratings. But I'm sure there's more to it. What I suspect is happening is that some users don’t really need industrials, but buy into the hype, the same way we buy Nike running shoes without ever spending a day on the track, or buy impressive-looking 4x4s and never go off-roading. I’m guessing these users have an inflated sense of their needs and buy an overhyped machine, and because they never needed an industrial in the first place, never discover the machine doesn’t live up to the hype. That’s my theory, anyway.

Do You Even Need an Industrial?

If you’re in the market for a sewing machine, ask yourself whether a domestic is fine, or whether you really need an industrial. Above all, don’t get your machine recommendations from the person trying to sell you the machine. Figure out whatever it is you want to do--make women’s handbags, make your own clothes, start a business repairing sails--find other people that have already done that, and ask them what machines are best suited to those tasks. Provided you are friendly, I find that most folks that have built up a lifetime of experience are happy to share it with others.

No matter what it is you want to use a sewing machine for, I can just about guarantee there’s some group of people on the internet that have already been doing it for years. Like that Leatherworker forum I linked to above. Find people with years or decades of experience and learn from their wisdom (and don’t forget to thank ‘em!). While the internet helps enable these false-industrial-sewing-machine sellers, it also empowers us to learn enough to avoid them.

Wednesday 25 January 2012

Reader Questions: Eric's Knee-Operated 15-91

All photos in this entry by Eric from Ottawa

Eric from Ottawa writes,

[The 15-91 I recently acquired] looks like it's in great shape, but it doesn't run. It has a knee switch rather than a foot pedal and it looks like the motor controller has failed. 

To test it, I unscrewed the center of the flywheel so there was no load and plugged it in and got nowhere, even with the knee switch in and fully engaged.

Do you think it's worth re-wiring it to use a standard foot pedal like most of the ones I've seen?


Hi Eric, first off, a little about your machine. The chrome rim on the handwheel plus the design on the faceplate, from the little bit of it that we can see in the photo up top, indicate this machine is from the 1930s or early 1940s (assuming those parts are original). The old-school cylindrical Singerlight visible in the photo below also indicates the machine is from that era.


The “J-“ prefix on the serial number plate indicates your machine was made in Singer’s Canadian plant in Quebec.


Secondly, good on you for trying to run the motor with no load, that’s exactly the correct first step to test out a motor.


As you’ve observed, your machine uses a knee-activated controller.
 

For those readers unfamiliar with this device, it was an early alternative to the foot pedal most of us know, and it eventually fell out of favor. It consisted of a motor controller placed in the right side of the wooden base:


The end of the removeable knee lever--which stows handily inside the case and underneath the machine, or occasionally up in the domed lid via clasps, when not in use--“plugs” into the hole in the front of the case.


Pressing against the lever would activate the motor controller, which is wired into the inside of the three-pin terminal.

Eric, there are three possibilities here: 1) The power cable is faulty. 2) The motor controller is faulty. 3) The potted motor itself is faulty. Hopefully it is #1 or #2 and not #3, as the first two are easy, relatively inexpensive fixes.

To see if it’s the power cable, try turning the light on. That’s not a 100% accurate test because the bulb may be burnt out, but at the very least, if the light does turn on you know there’s power flowing through the cable. Another thing you can do is bring your cable to the house of a friend with a vintage Singer--that cable will fit a variety of machines made in the 1930s, ‘40s, ‘50s and some in the ‘60s--and see if it powers his/her machine okay. If you determine your cable is what’s faulty, you can order a replacement from Sew-Classic for US $7.95 right here. If you choose to go with a different supplier, perhaps someone local to you in Canada, note that you’re looking for a “single-lead” (as opposed to “double-lead”) cable.

If the motor controller is the problem, it is totally “worth re-wiring it to use a standard foot pedal,” to answer that question, and the good news is that it doesn’t quite require “re-wiring.” The motor controller leads are easily removed via two thumbscrews inside the three-pin terminal. There’s no cutting of wire or soldering required, it’s a simple mechanical connection. To see how to remove the leads, click here and look at the parts of the entry that pertain to removing the two motor leads, which in your case are really the controller leads. Be sure to note which two pins in the terminal those leads connect to.

To replace your motor controller with a foot pedal, you’ll need to spend a tad more. You’ll need to buy a foot controller; the least expensive offered by my preferred supplier, Sew-Classic again, goes for US $11.95.

What you can do is connect the two leads from your new foot pedal to the same two posts that you disconnected the original motor controller leads from. Then you can remove the old motor controller (attached via screws) from that compartment on the right of the wooden base, and store the pedal there.

Alternatively, if you’d like an original Singer foot pedal, you can check eBay.

If it’s the motor that’s bad, then you’ve got a fair amount of work ahead of you to figure out what exactly is wrong with it, and if it’s fixable. You may want to browse the complete “How to Re-Wire a Potted Motor” to determine how to disassemble the motor so that you can inspect the wiring, one possible culprit. But if it’s something beyond bad wiring--a burnt-out field core, for example--that’s beyond the range of my fix-it knowledge.

If you do determine the potted motor is what’s faulty, you will occasionally spot someone selling one on eBay.

Whatever you do, please don’t throw that motor controller out, even if you determine it’s bad; if you stay in this hobby long enough, you will eventually encounter someone else who may need a part from that controller--even if it’s just a single screw--so you may be able to help them rescue an otherwise non-functioning machine. Ditto with the knee lever.

Best of luck with it, congrats on the machine--I love those chrome-rimmed handwheels!--and let us all know how it turns out.

Friday 6 January 2012

Hans and the Singer 206, Part 2


Here's Part 2 of Hans from Chicago's questions about his Singer 206.

Is there any type of regular maintenance a 206 requires (oiling?) to care for them?
Of course. Every vintage Singer requires regular oiling at a minimum (click here to learn how to oil your machine), and I always check the wiring and the motor for safety’s sake. You'll also want to check that the belt is properly adjusted.

This machine came with a needle, bobbin and bobbin case, so I believe it is operable. Are there other attachments that are needed/beneficial?
Needed or beneficial for what? Please understand it is impossible to answer vague questions like this.

I have read this machine uses an unusual needle (206x13) and using the wrong one will nick up the bobbin case.


That’s absolutely true, a 15x1 needle should not be used on this machine. The 206x13 needle is a bit more expensive than the more common 15x1 needles used by model 15s, 201s, 221s et cetera. For that reason, some people muck with the timing on the 206 (and related 306) to use the 15x1 needle, but based on what I’ve read from those more experienced than I, this is not a good idea and ought not be done.

For your edification on this topic, I recommend you join the Vintage Singers Yahoo Group and search through the archives to read up on it. I do not recommend you pose questions to the group on that topic until you have read through the archives, as it has already been discussed to death; many of the kind and knowledgeable folks on the forum have dedicated much of their time to explaining it, and I think it would be inconsiderate to ask them to repeat themselves.

Do you know of a good supplier for these needles?
There are tons of suppliers, but I haven’t ordered enough 206x13 needles to know which is better than another. I’m not the best person to answer this question, you’re better off poking around on forums that deal more heavily with actual sewing.


Is the 206 really "The Singer That Should Be Forgotten"?
Hans, like many people you're sending me a question seeking a factual answer to a matter that is rooted in opinion. You might as well ask me "Is France really a good place to live?"

The link you’ve provided is to the blog written by Ed L., a well-respected vintage sewing machine aficionado who founded the Vintage Singers group. I’ve never had the pleasure of corresponding with Ed, but I believe he would tell you the same thing I would: That a sewing machine becomes an intensely personal item to the user, and that there’s no accounting for taste. If you spend time around them you’ll find there’s a model you ought to hate that you simply love, and vice versa. Ed clearly states his reasons for why he dislikes the 206.

Another vintage sewing machine aficionado was the dearly departed Ray W., a longtime contributor to various sewing machine forums, and he has stated that the 206 was one of his favorite machines and his main machine for many years.

Whether or not the 206 should be forgotten by you is entirely up to you.